-
Before
any work begins all necessary materials and supplies should be
brought into the work area. The work area should be roped off
and warning signs posted. (Barrier tape with a pre-printed
asbestos warning sign works well for this purpose).
-
Before
starting any removal work, inspect the insulation material along the
entire length of the pipe to be stripped. If it is damaged,
clean the pipe work and surrounding surfaces using a Type H vacuum
cleaner and seal the damaged areas with tape or cover them with a
'cut and wrap skin'. (remember that when doing ASBE
Glovebag work that loose
pipe lagging several feet away may be disturbed, so the environment
outside of the Glovebag should always be carefully monitored.)
-
ASBE
Glovebags cannot be used
on pipes over 50° C.
If possible, always isolate the heating and ventilation equipment in
the working area.
-
Don
respiratory protective equipment (RPE) and overalls in accordance
with the employers assessment of exposure and check face fit.
-
Fill
the water sprayer with water/PVA and obtain pressure.
-
The
ASBE Glovebag
has a zipper top and shoulders at 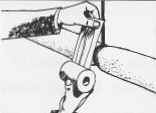 each
end. Place the ASBE Glovebag
over the pipe work and close zipper. Then place one strip of
duct tape along the top zipper of the ASBE Glovebag for
reinforcement.
each
end. Place the ASBE Glovebag
over the pipe work and close zipper. Then place one strip of
duct tape along the top zipper of the ASBE Glovebag for
reinforcement.
-
Pass
the tools required (these will usually include a hammer, Asbesaw,
retractable utility knife, wire wool, rags and wire cutters) through
the shoulder inlet and insert into the ASBE
Glovebag tool pouch.
Seal the shoulders using non-slip tie straps.
-
Lay
a sheet of 1000 gauge polythene on the floor underneath the ASBE
Glovebag and locate a
bucket of water and sponge close by for final clear up operations.
-
Insert
the nozzle from the water sprayer through the water spray inlet and
fasten in position. Then direct the water spray at the
insulation material and shoulders of the ASBE
Glovebag to reduce the
emission of fibres.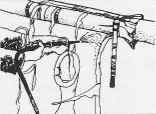
-
Use
the Asbesaw to cut the insulation at each end of the section
to be removed inside the ASBE
Glovebag. Throughout
this process water should be sprayed onto the cutting edge to keep
dust release to a minimum.
-
Once
the ends are cut, removal work can commence. Some sectional
insulation may be slit from end to end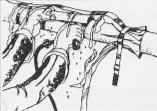 using the utility knife along the bottom of the pipe. Some
insulation may have wires to be clipped. Other sections may
need to be chipped away using a hammer and this again should be done
from the bottom of the pipe. The the insulation can be lifted
off the pipe and placed into the bottom of the bag.
using the utility knife along the bottom of the pipe. Some
insulation may have wires to be clipped. Other sections may
need to be chipped away using a hammer and this again should be done
from the bottom of the pipe. The the insulation can be lifted
off the pipe and placed into the bottom of the bag.
-
Spray
the lagging with water at frequent intervals - on the pipe work and
at the bottom of the ASBE
Glovebag and wash down the
walls of the ASBE Glovebag
to maintain visibility.
-
When
the insulation material has been stripped from the pipe, spray clean
the tools and place them back in the tool pouch. Then, using
wire wool, rags and water, scrub and wipe down the exposed pipe
inside the ASBE Glovebag.
-
Once
the section of pipe is clean and asbestos-free thoroughly spray the
side walls and contents of the ASBE
Glovebag with amended
water and dampen the exposed ends of the insulation remaining of the
pipe work (which can be painted with an encapsulation membrane).
-
If
fitted, close the internal zip to seal the lower portion of the ASBE
Glovebag and its asbestos
waste materials, or cover with foam spray.
-
If
more than one adjacent sections of pipe work lagging is to be
removed, loosen the ASBE
Glovebag tie straps at
each end and slide the ASBE
Glovebag along the pipe to
the next section. Then open the internal zip and repeat the
stripping operations.
-
Once
the stripping operations have been fully completed and the bag and
tools thoroughly washed down, remove the water spray nozzle form the
water hose inlet and seal with duct tape.
-
Put
all tools in one gloved hand and pull hand and glove out inverting
the glove which will now contain the tools inside. Twist the
glove to create a separate pouch and double tape or wire tie the
glove to seal. Cut between the two separate pieces of tape or
wire ties and place the new glove pouch into the next ASBE
Glovebag or into the
bucket of water. Open glove tool pouch under water, clean
tools and then allow to dry.
-
Slip
a 500 gauge asbestos waste disposal sack onto the ASBE
Glovebag (still attached
to the pipe). Then remove the tie straps from the shoulders
and the duct tape tape covering the zipper. Unfasten the zip
enabling the ASBE Glovebag
to fall gently into the waste disposal sack.
-
Remove
overalls and place these into the asbestos waste disposal sack and
then twist the top of the sack and seal with wire ties.
-
Tidy
up the work area. Then, using a damp rag, wipe the exterior of
the respirator and leave the work area. Remove the respirator.
-
Asbestos
containing material must be disposed of at an approved
landfill site in accordance with the waste regulations.
-
Once
the area has met the criteria for re-entry by unprotected personnel,
the barriers may be removed and re-insulation completed.